What is Facebook Retargeting?
Facebook retargeting is a PPC strategy where you show your ads on Facebook to people who have either previously visited your website or interacted with your Facebook or Instagram page. Simply put, Facebook retargeting is the process of finding people on Facebook who have already shown interest in your products and convincing them to purchase your products with paid Ads.
Facebook retargeting ads can yield higher ad engagement, brand ad lift and awareness, click-through rates, and conversions, all at a lower CPC than the majority of campaigns targeting cold audiences.
But how does Facebook find the people who have already visited your website or took certain action on your site?
Facebook/Meta Pixel
Now comes the magical Facebook/Meta Pixel!
According to Facebook, the Meta Pixel is actually just a piece of code that you need to put on your website that allows you to measure the effectiveness of your advertising by understanding the actions people take on your website.
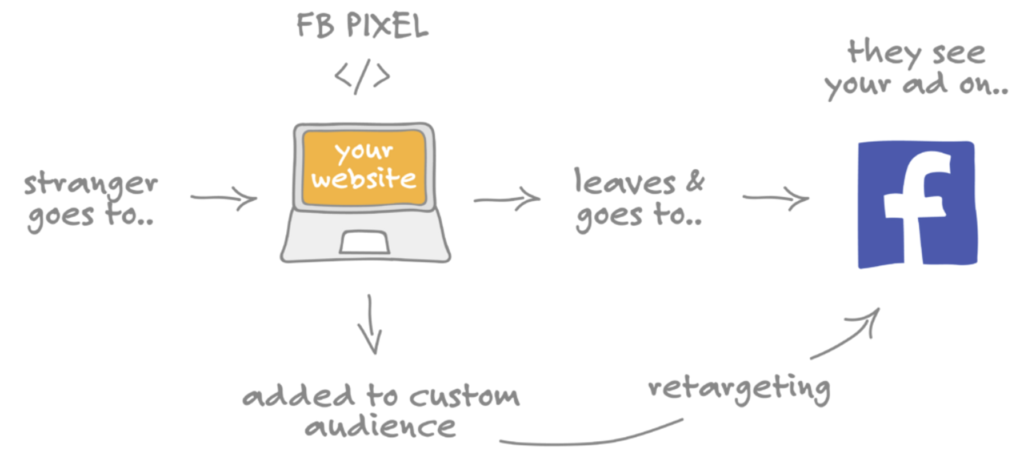
So, first you need to embed the Meta Pixel in your website (or on Google Tag Manger to make your life much easier later on!). When there’s a potential customer visits your site and took certain action, let’s say he or she somehow abandoned the shopping cart. But since we already set up the custom event on Google Tag Manager correctly, the Meta Pixel will be able to tell Facebook who that person is, so very soon that potential customer will see your ads on Facebook. And if you offer some discounts on your ads, very likely you will convert this potential customer to a real customer!
The Meta Pixel can help you to:
- Make sure your ads are shown to the right people. Find new customers, or people who have visited a specific page or taken a desired action on your website.
- Drive more sales. Set up automatic bidding to reach people who are more likely to take an action you care about, like making a purchase.
- Measure the results of your ads. Better understand the impact of your ads by measuring what happens when people see them.
5 steps to track conversions after Apple’s iOS 14 privacy changes
Aggregated Events Measurement was a direct response of Facebook to Apple’s iOS 14.5 update that would significantly limit the amount of data that could be sent back and used from the apps on Apple devices to create targeting/retargeting ads and audiences. But what is Aggregated Events Measurement exactly?
According to Facebook,
Meta’s Aggregated Event Measurement is a protocol that allows for measurement of web and app events from people using iOS 14.5 or later devices. Aggregated Event Measurement currently limits domains and mobile apps to 8 conversion events that can be configured and prioritized for Aggregated Event Measurement.
Sounds a bit complicated, but actually you just need to follow the following steps to configure web events for iOS 14.5 and later ad optimization.
Step 1: Verify Your Domains
Once the iOS 14 privacy changes take effect, all ad sets optimizing to a pixel event on an unverified domain will be paused.
Therefore you need to verifiy your domains inside of business manager. And you must go through and verify every domain in which you are going to be recording conversion events from. So every domain where you’re going to be triggering Facebook conversion events has to be verified inside business manager.
Now it’s time to set up your aggregated event measurement!
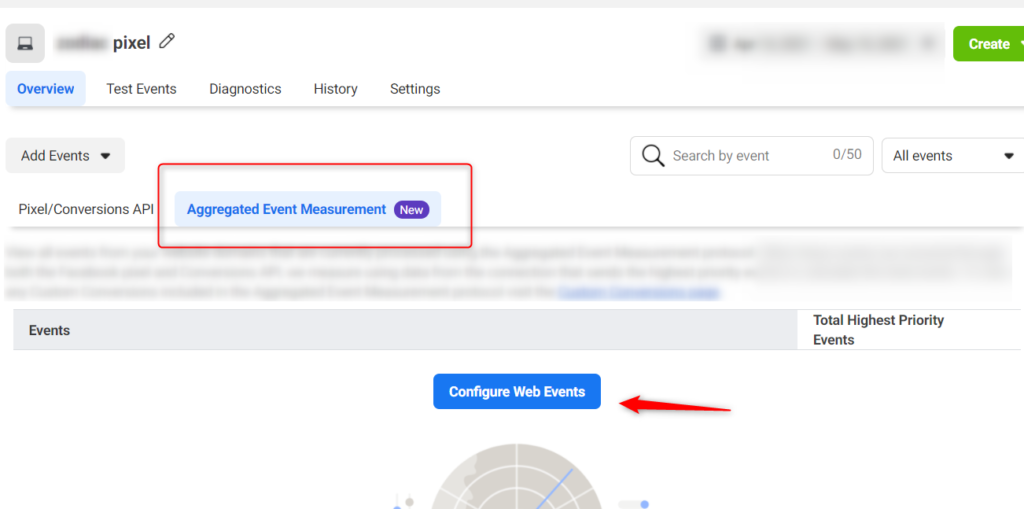
Click “Aggregated Event Measurement”, then “Configure Web Events”.
Step 2: Analyze Your Current Event Setup
Before you set up up to 8 conversion events in the following interface, most likely you will need to analyze your current events if you have been using Facebook ads so far.
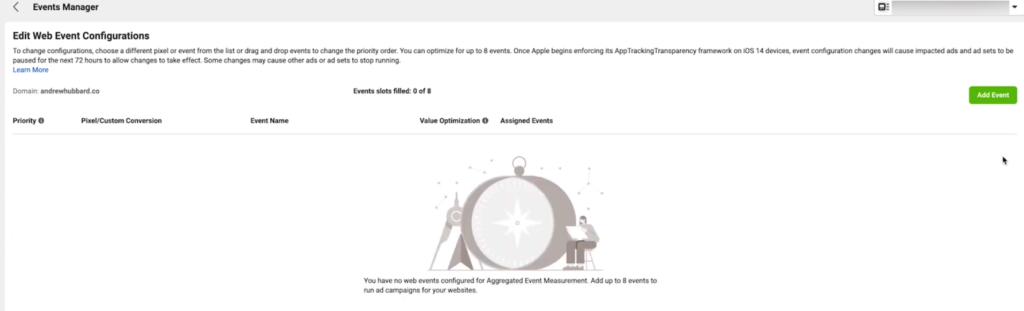
So take a good look at your Events Manager and determine if your current tracking setup is ready for the changes.
- Do you have more than eight events?
- What events are absolutely critical to your tracking needs?
- Are there any tracking gaps that need to be filled?
- Can any standard events be replaced with custom conversions that don’t count against your eight?
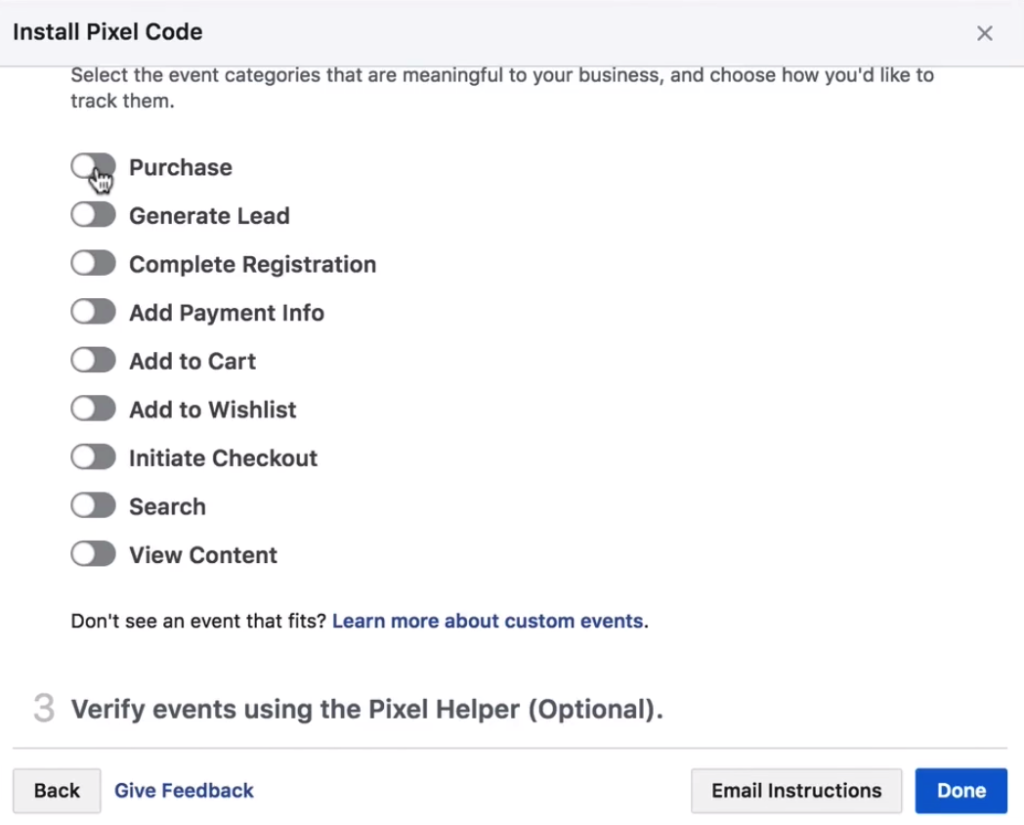
Step 3: Select Your Eight Events

Please notice that when you click this drop down of events, the only events that will be listed are the events on that domain that have already been fired. So if you’ve only ever triggered the lead event on your domain with that pixel, then only lead will show in this dropdown.
If you need to get other events added to the dropdown, simply go and set up the conversion event on your domain, trigger that event yourself by simply visiting the page that triggers the conversion event. You might need to give it a little bit of time, five to 10 minutes is usually enough.
So once you’ve triggered those events, refresh the page and you should see them in the dropdown.

About Purchase Event
Something really important to note with the purchase event, ist that you have this option here to turn value optimization on. By turning value optimization on here, it’s going to use four of your eight assigned slots instantly. So in order to enable value optimization you will have to give up four of your eight slots just to enable that. The reason is because it creates value groups and it might create a group of let’s say, $1 to $50, and then another group that’s $51 to $100, and then a third group and a fourth group. It does that based on conversion values that it received in the past from your pixel.
Please notice here in order to be able to enable value optimization, you have to record at least 100 purchase events on the domain in the last seven days. And you also must have had 10 distinct values in the last seven days, that will allow you to enable value optimization. We usually recommend our clients enable it if possible.
Step 4: Rank the Events by Priority
Due to the upcoming tracking limitations, according to Facebook,
When a customer takes several actions during a web session, only the corresponding event that’s highest in priority will be sent to Facebook for a conversion.
So it is really important to set up the Priority here. What is going to happen is Facebook is only going to report conversion event for that user for you. Meaning if somebody comes to your website and they view some content and then they become a lead and then they initiate checkout and then they purchase, it’s not going to show you all of those conversion events inside of ad manager. Facebook will only show you one of those events and the one it will show you, is the highest priority event as you’ve chosen here.
What we usually recommend to do here is to arrange them in order of bottom of funnel to top. For example, the purchase is going to be at the top, because it’s the bottom of our funnel event. Since that’s the most important thing we usually want to see, we want to see if the ads are driving purchases. Then for example, view content is the first thing we usually do, so it’s at the top of the funnel, we need to reverse the funnel, so simply put “View Content” at the bottom.
Therefore, Purchase →Initiate Checkout → View Content

Set up Facebook Pixel with Google Tag Manager
To set up our Facebook Pixel in Google Tag Manager, we’ll need to go over to “Tags” on Google Tag Manager and click on “new”.

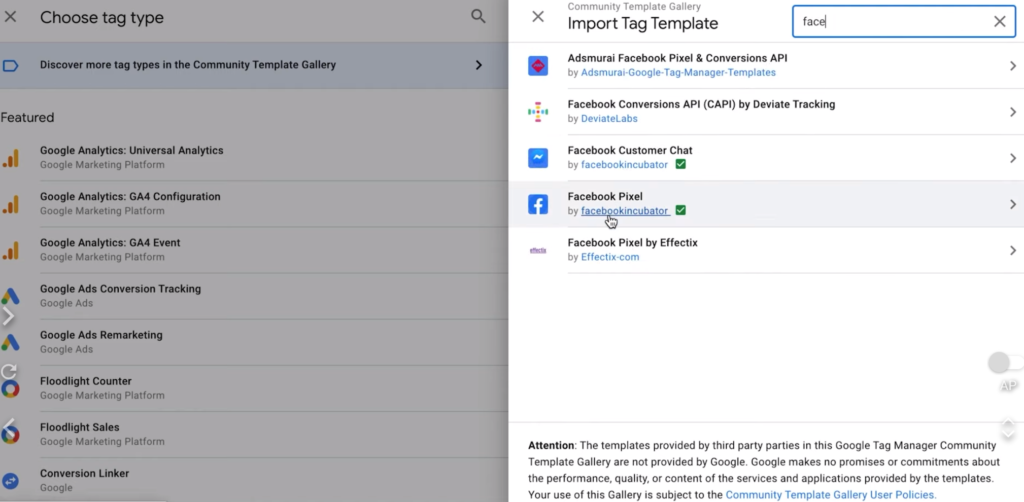
The next step we will need to go to the community gallery to find a Facebook Pixel template.
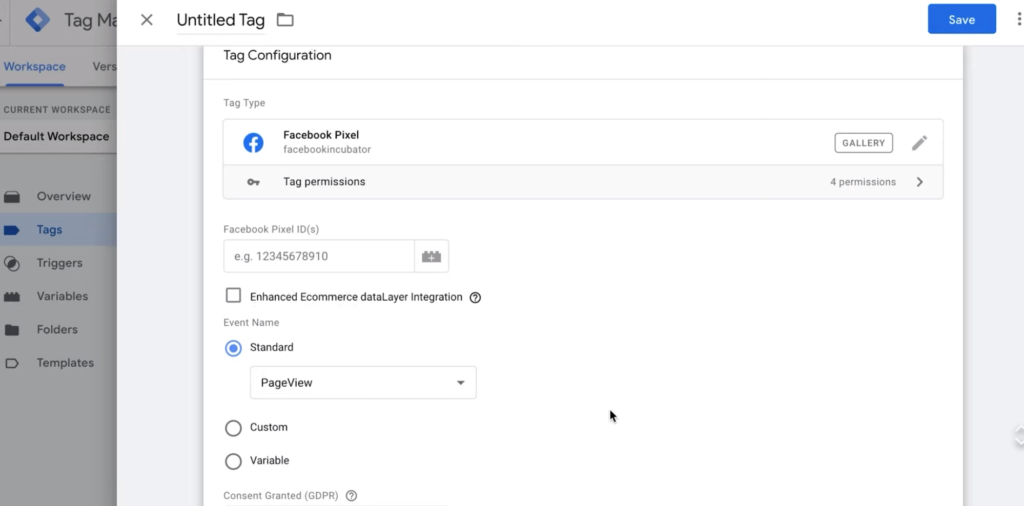
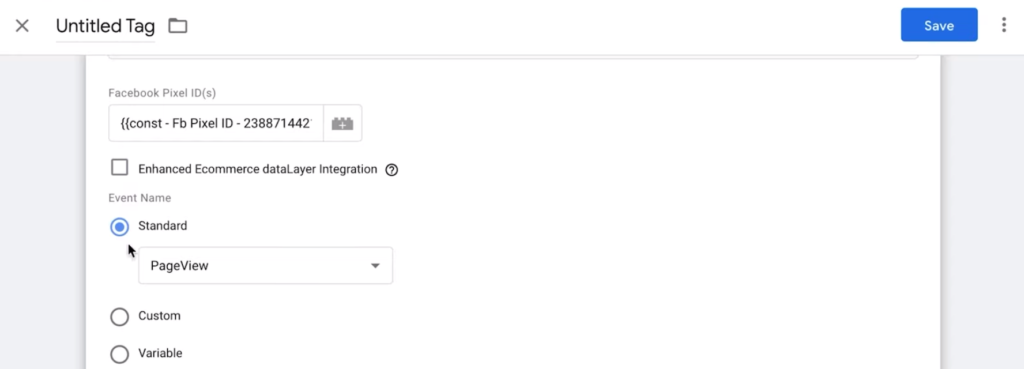
Next, we just need to fill out the Facebook Pixel ID which you can find in your Facebook Events Manager and simply copy it to Google Tag Manager. But we recommend you make a variable here so you don’t have to copy paste every time in the future.
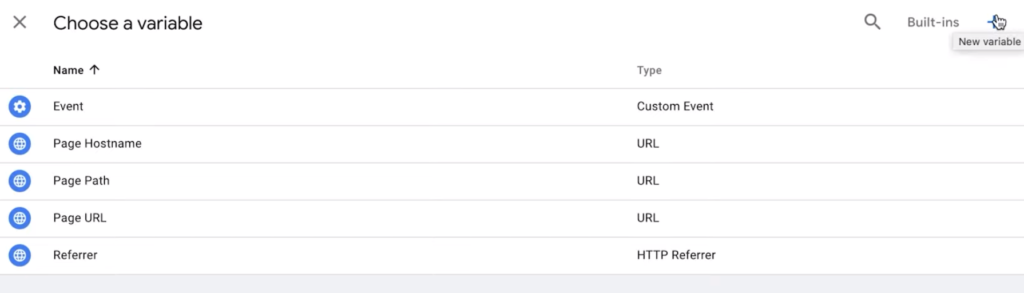
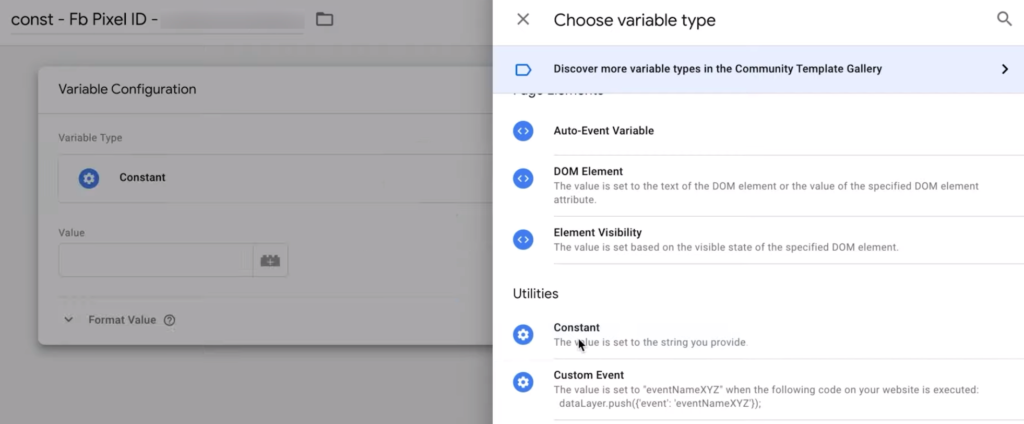
We can save our pixel ID in a new variable by clicking on this plus button and this will be a constant variable.
The next step is to fill out the name of this new variable and choose “Constant”.
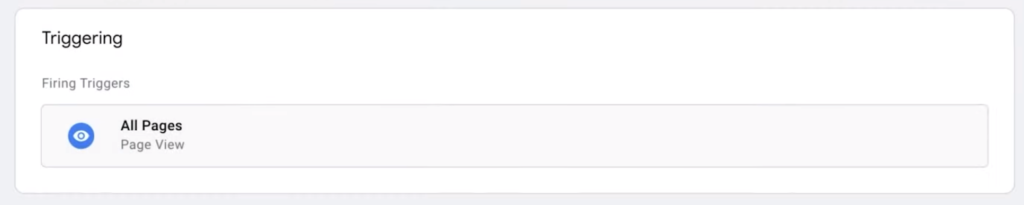
Make sure “PageView” is selected, name your new Tag, connect to the trigger of “All Pages”, then click “Save”.
Now we have set up Facebook Pixel with Google Tag Manager!

If you install the Facebook Pixel Helper in Google Chrome, you will be able to verify if the pixel has been embeded correctly.

Additionally, you can also verify it on Facebook Business Manager. Just click “Test Events”, you shall able to see the pixels being fired correctly.

Retarget Website Visitors
Eevery day you’re getting people coming to your website, hundreds, possibly even thousands of people, but only a very small percentage of those website visitors are going to actually sign up for your email list. Most of those visitors, probably 95% are going to read a piece of content or watch a piece of content. Even if they enjoy it, they’re probably going to leave and never come back. So that leaves you with a lot of potentially wasted leads. You can use some simple Facebook ad retargeting to capture a lot more of those people as email subscribers so that whenever you release a new piece of content, you can email them, tell them about it, and bring those people back to your website.
So what we’re going to do is create a Facebook ad retargeting system where somebody visits your website, if they don’t opt into your email list, they see ads for the next week or so just promoting a simple freebie that they can get by entering their email address or joining your email list.
So the only thing you need for this is website traffic sent to Facebook by the Meta pixel which we already installed. Aditionally you need a free checklist, a cheat sheet, a PDF, something that you can give people in exchange for an email address and you need to already have a landing page set up for that.
Now let’s look at how we actually implement this inside the Facebook ad manager.
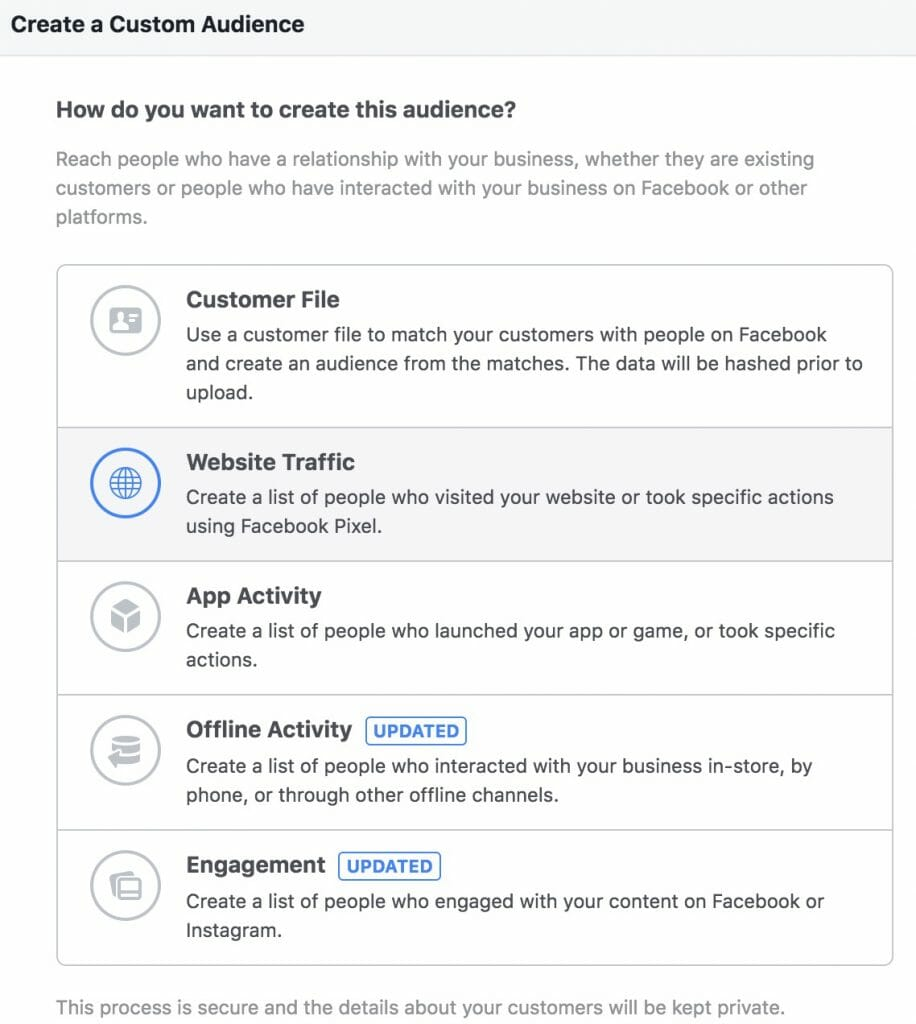
The first thing we want to do once we get here is head on over to audiences tab, click the menu in the top left and then click “audiences”. What we’re going to do now is to create a custom audience.
custom audience
Here we choose “Website Traffic”.
Next, you need to choose your pixel and here as an example we choose “all website visitors” in 30 days. So this is going to put everybody who visits my website in the last 30 days period into this audience, which I will then be able to target with my Facebook ads.
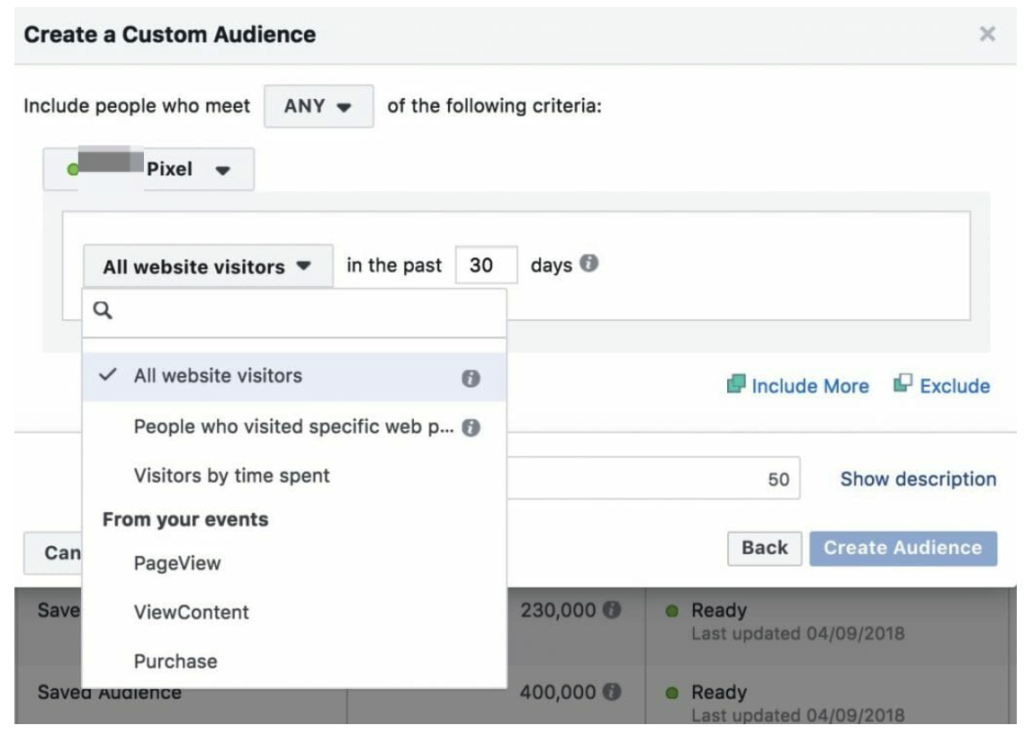
That’s what a custom audience is. It’s simply an audience defined by you. So you set the parameters and tell Facebook who you want to be inside this audience. And then Facebook will go and populate it for you and you can then target that audience with your ads. So in the case of this audience, it’s going to be everybody who’s visited my website in the last 30 days.
Last step, we simply give it a name and click “create audience”.
Targeting website visitors seems easy, but what if we need to target people who took specific actions on a website? Because website visitor traffic is based on pageview, which is just one simple user interaction. It doesn’t mean that people have actually interacted with the page clicked somewhere, watched a video, added something to cart or actually purchase a product.
In order to get the most out of your facebook pixel tracking we will need to set up “event tracking”. When we start tracking events. Not only we can see how many times that event has been fired, but also we can create custom audiences based on that event. And we can define that event as a click conversion. So we can use that custom conversion to optimize our Facebook campaigns for.
Track Facebook Standard and Custom Events
Now we already went through the process of installing the base Facebook pixel, which tracks user visits to various pages on the site.
Facebook pixel provides another level of tracking that allows you to track specific actions that users take on your site. These actions are called Events in Facebook tracking and each user activity is defined via a unique Facebook event.
Once you track these user actions, you can then create a custom audience on Facebook to target users with specific ads based on the actions they have taken on your site. But first let’s take a closer look at Facebook events and how to track them with the help of Google Tag Manager.
standard and custom events
There are two categories of events: standard and custom events.
Standard events are actions with predefined names that we recognise and support across ad products.
Here are the standard events that Meta pixel supports:
- PageView
- AddPaymentInfo
- AddToCart
- AddToWishlist
- CompleteRegistration
- Contact
- CustomizeProduct
- Donate
- FindLocation
- InitiateCheckout
- Lead
- Purchase
- Schedule
- Search
- StartTrial
- SubmitApplication
- Subscribe
- ViewContent
You can find the details of all the standard events on Facebook official site.
https://www.facebook.com/business/help/402791146561655?id=1205376682832142
Custom events are actions that fall outside those covered by our standard events. You can give them a unique name to represent the action taking place.
For example:
- Scroll
- Time on page
- Viewed a certain element
- Outbound link click
- Video play, etc.
It’s all up to your imagination. However, keep in mind one thing: while you can still build custom audiences with custom events, you cannot use them for conversion optimization within Facebook Ads. Facebook simply does not know what a certain custom event means.
With standard events, Facebook knows that a purchase is more important than a ViewContent, while the Custom events like Scrolled and Canceled Subscription are on the same level of uncertainty.
Now let’s take a look at some examples of Facebook events tracking.
Lead Tracking (standard event)
You want to track when someone enters their email on your landing page. Looking at the list of possible standard events, this one should be considered a Lead. So, let’s create a tag that will send the “Lead” event to Facebook.
In Google Tag Manager, go to Tags > New > Facebook Pixel and enter the following settings:
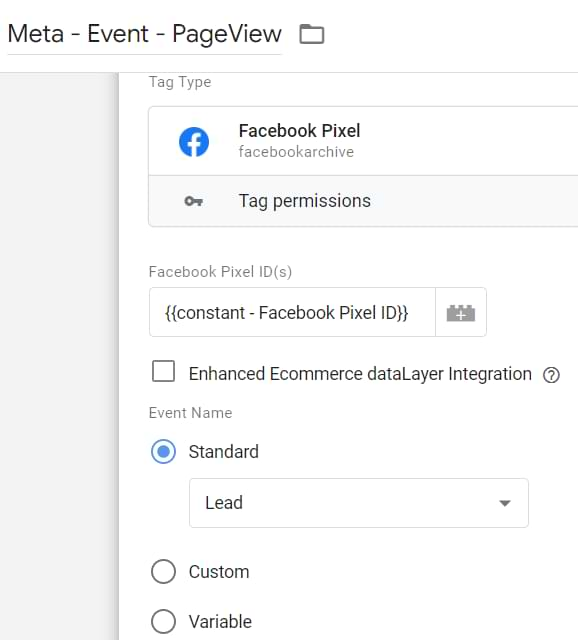
In the Event Name field, we chose Lead. For now, keep all the other fields empty. The next thing for the tag to work properly is to define a trigger.
Now let’s imagine that a visitor (after entering email) is redirected to a “Thank you” page www.example.com/thank-you. We could create a PageView trigger that fires if the Page URL contains “thank-you”.

So far we have discussed about Facebook standard events that you can set up in Google Tag Manager to track many types of user interactions on your website. But there’s actually more information that we can send over to Facebook, like the value of the conversion. So we can optimize our ad campaigns and then later see that in our ads interface. So it’s crucial that we set up conversion tracking and purchase tracking correctly on your website and now we’re going to show you how to do this with the help of Google Tag Manger.
Purchase Tracking (standard event with dynamic value)
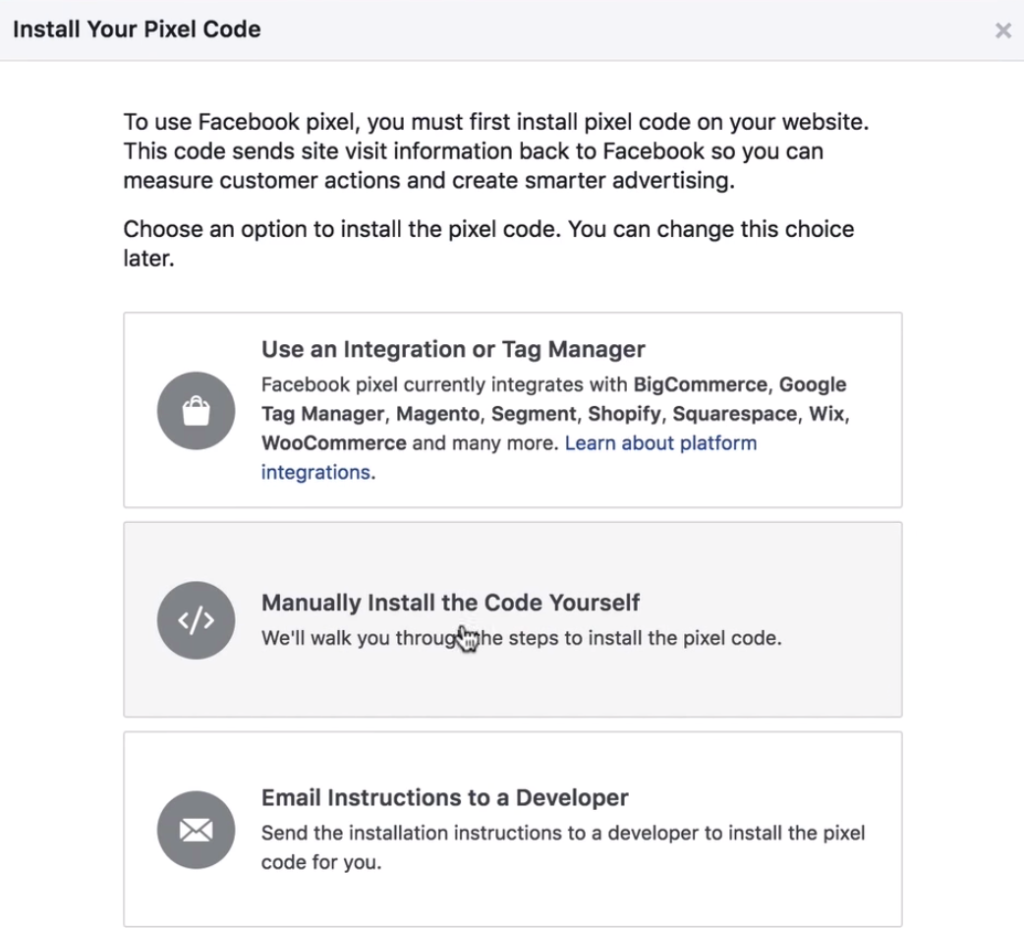
In order to set up Purchase Tracking, we need to go to ”Set up” and then click ”Manually Install the Code Yourself”. For the Purchase event, you simply deploy the tracking code.
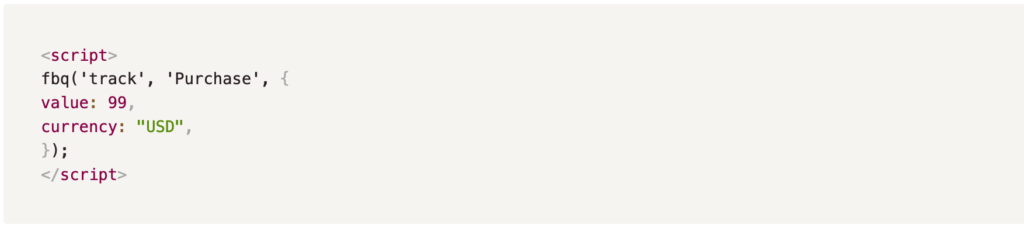
Step 1.1 – Install Pixel Code (for fixed purchase amount)
If you have a conversion value for example of 99 dollars, and currency as USD, you can simply input the values as following, Facebook will generate the code for you automatically. Then you just need to copy the code to Google Tag Manager.
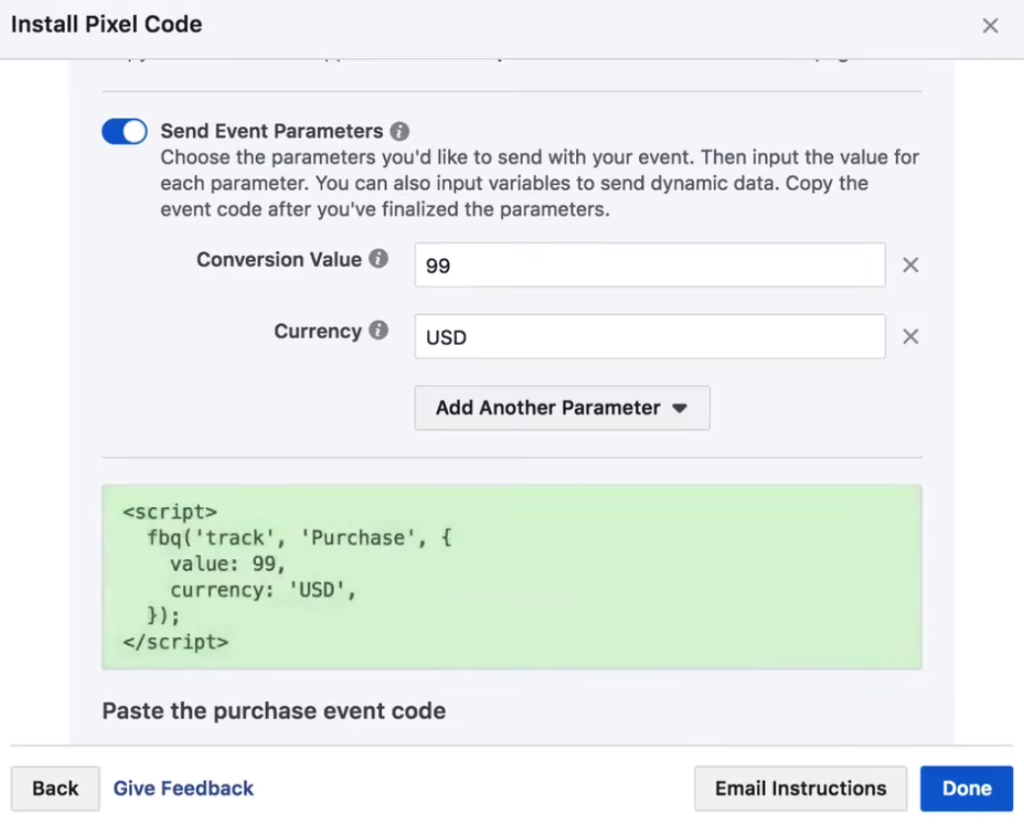
But what shall we do if we want to get the amount into Google Tag Manager dynamically instead of a fixed amount? Well, there are different methods and the most robust way is to build a custom data layout.
Step 1.2 – Create Data Layer Variable
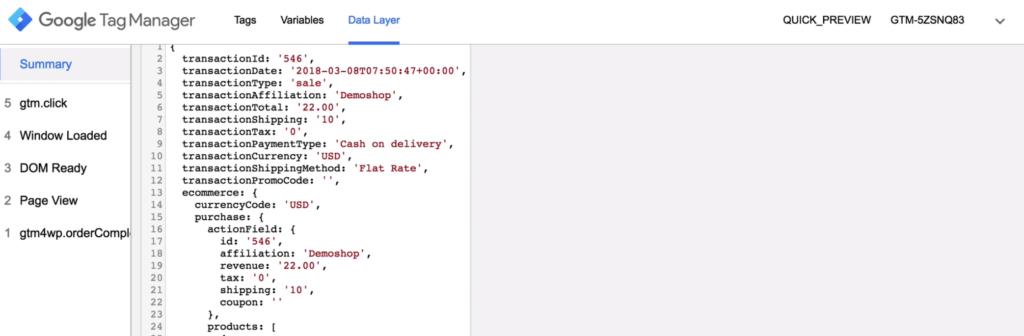
In order to see the data layer, and where the information is, we need to enter our preview and debug mode on Google Tag Manager. In the following example, we can see that we have a transactionTotal here which which resembles the total amount that was bought by the user. You also have a transactionCurrency here, which might be useful if you have customers purchasing your products with different currencies.
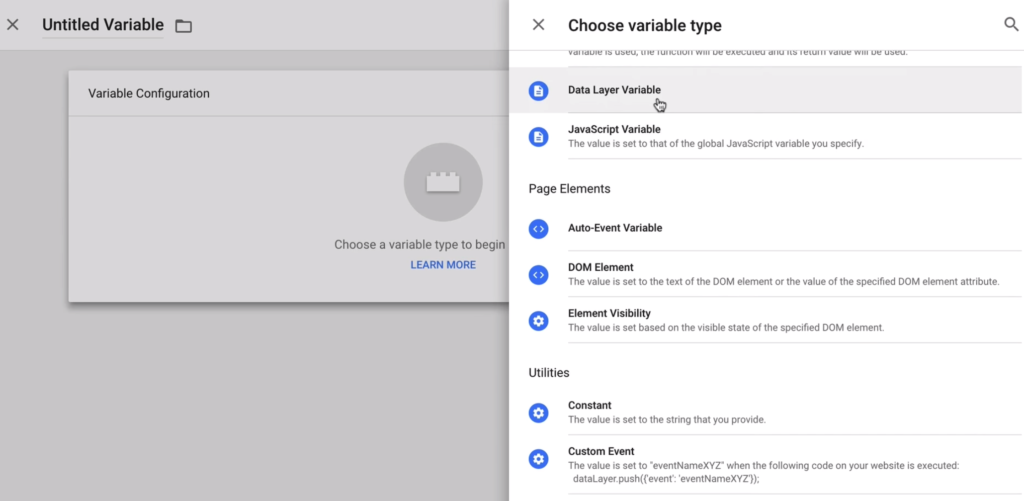
Now we just need to pull the transaction total from the data layer. To do this, we will build a variable in Google Tag Manager. Variables are like place holders, so you can build them dynamically to pull them from places like the data layer. Here you can Choose variable type as a Data Layer Variable and this will allow you to access the information from the data layer.
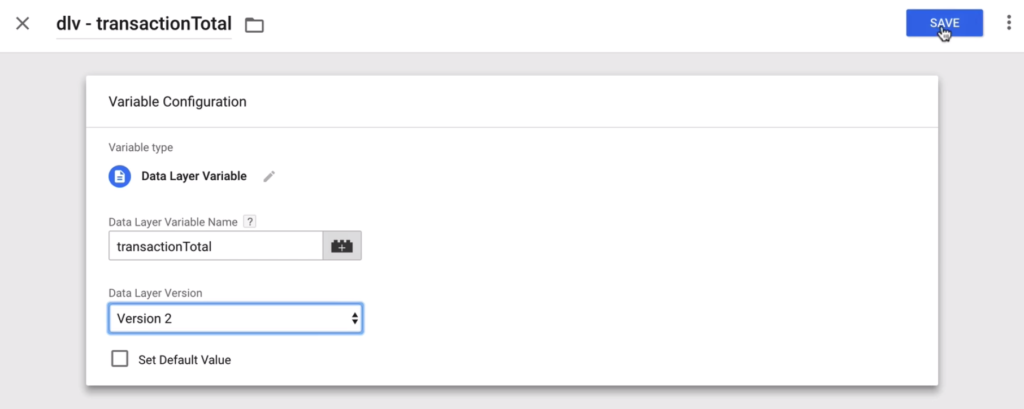
Give this variable a name. The only configuration left is the Data Layer Variable Name.
That’s the key that we saw in the Javascript object before. So in our case, it will be transactionTotal. Click on Save and we have this now available in the Google Tag Manager as a variable.
Step 2 – Set-up FB Purchase Event Tag
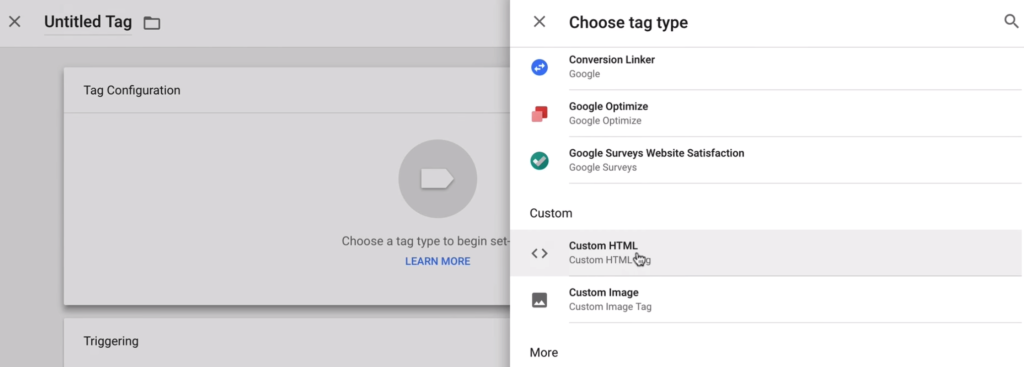
we can go to the next step and copy our JavaScript code to Google Tag Manager. We then implement this as a New Tag. Here, we will select Custom HTML.
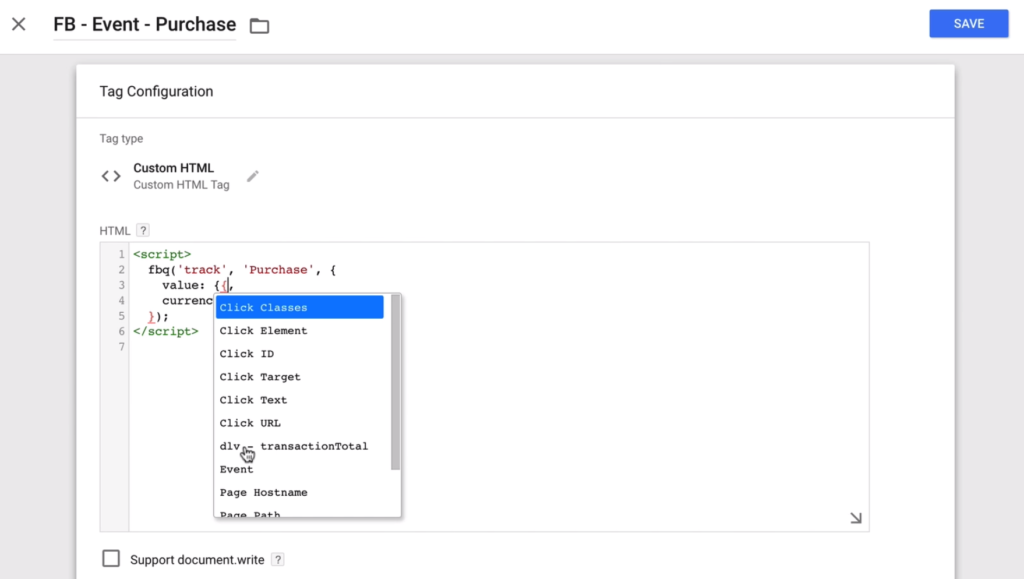
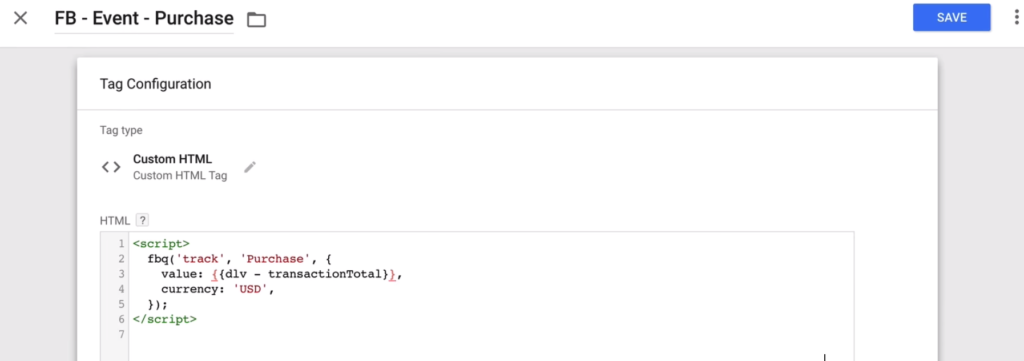
Give the Tag a name and as the HTML code , paste the JavaScript code that you had copied.
But npw you need to customize this if you don’t want all our products to result in 99 dollars once this fires.
So you will dynamically insert our variable, which can be done with two curly brackets. This opens up a menu with all your different variables in here. You can click on dlv-transactionTotal which was already created beforehand, and that will be replaced dynamically with whatever is in the data layer.
Step 3 – Create Conversion Trigger
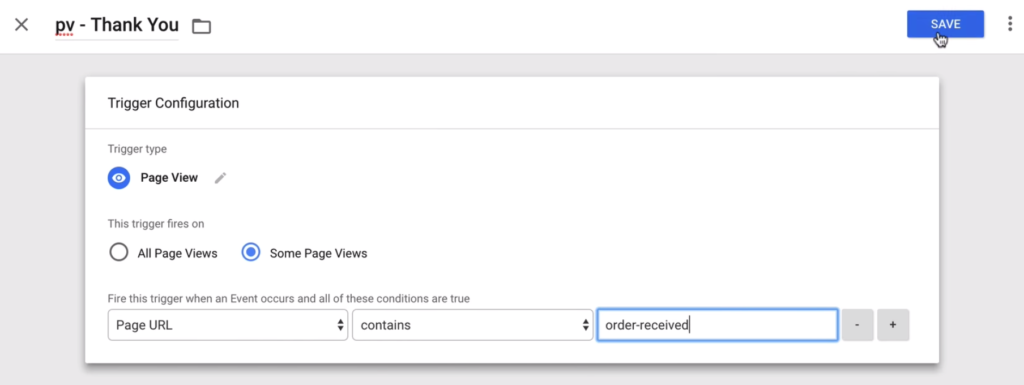
Next, you need to build a trigger so that Google Tag Manager will know when it should send the data to Facebook. You could look at the URL and would want to deploy this on your order-received page since that is in the URL.

So this trigger will only fire on Some Page Views, where the Page URL contains our order-received.
Step 4 – Create Custom Conversion based on the Purchase Event
Now we can use the Purchase Event that we just created for our Custom Conversions.
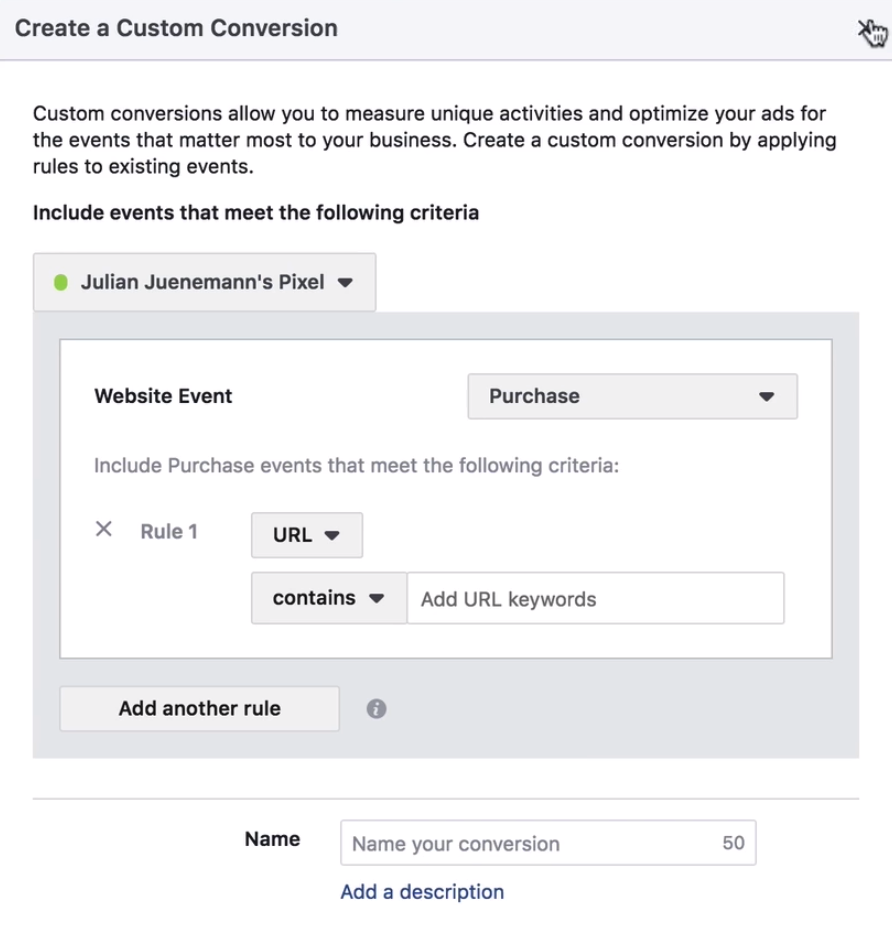
In Facebook business manager, click on Custom Conversions → Create Custom Conversion in your Facebook Pixel.
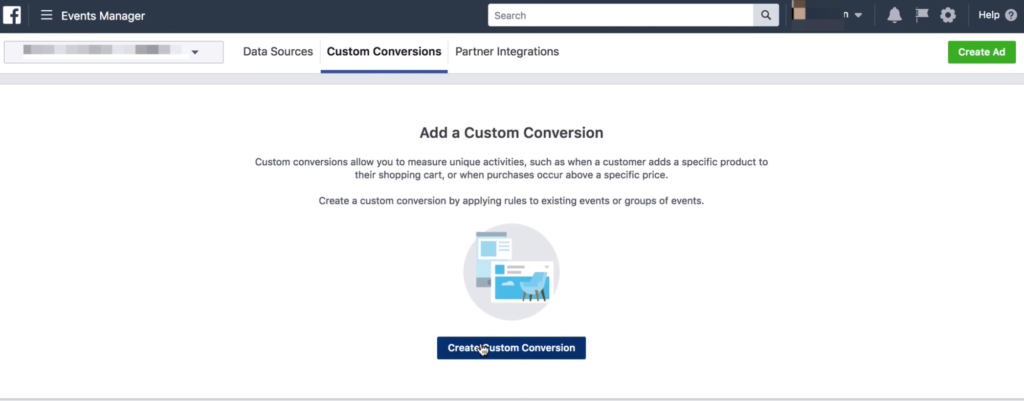
Here, choose Purchase Event as a Custom Conversion.
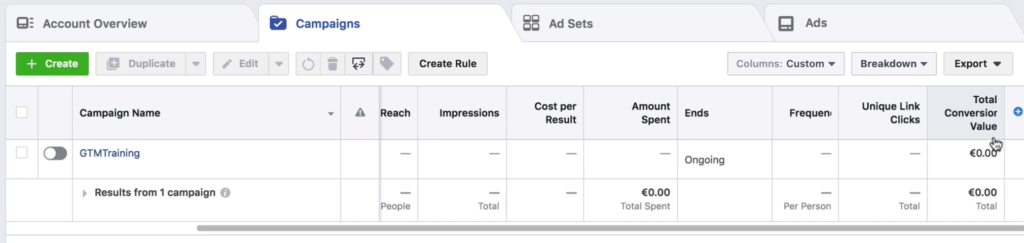
And once this is set up, you will be able to get columns filled that correspond to the conversion value of your campaigns. For example, in the Ads Manager, if you have a campaign, you should be able to see the actual conversion value, in a column, that you can add in your Ads account.
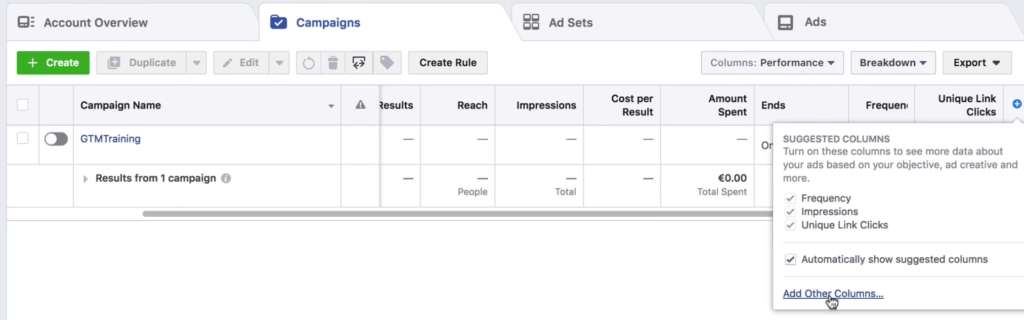
Go to Ads Manager → Add other columns… and select Total Conversion Value.
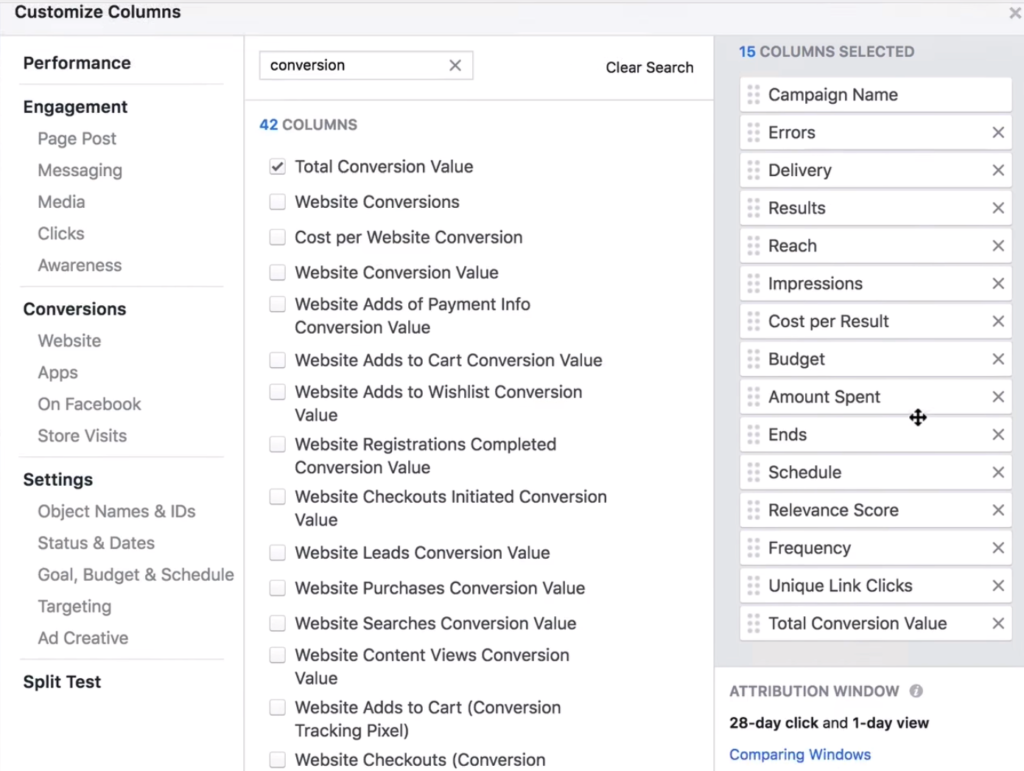
This new column “Total Conversion Value” should be filled with the amount that is transferred later on. This will give you some more data on how many clicks you received and how much money you made in the end. So, you will have a meaningful dataset in your Facebook campaign report.
In conclusion, Facebook retargeting is a powerful tool for businesses looking to reach their audience more effectively. By using the techniques outlined in this guide, businesses can create highly targeted ads that are more likely to convert. From setting up custom audiences to using the Facebook Pixel, there are a variety of ways to optimize your retargeting strategy and increase your ROI. With the help of retargeting, businesses can turn website visitors into paying customers and grow their online presence. Remember to regularly analyze your results, and don’t hesitate to experiment with different ad formats, audiences and targeting options to find the best results for your business.